Categories
- Curriculum: Art
- Age/Grade: Elementary 2, Elementary 3, Middle School
- Subject: Drawing, Painting
- Materials: Paint, Pencils
- Institution: Rosedell Elementary School
- Location: Santa Clarita, California
- Duration: 2 Classes
Description
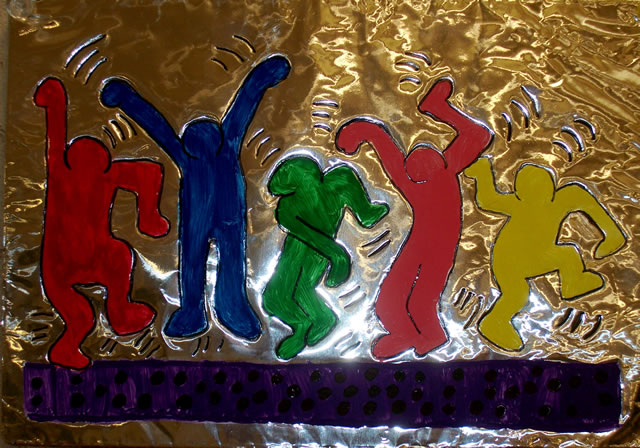
A fun project where kids paint Haring figures on aluminum foil.
Materials
Tag board or Cardboard
Heavy Duty Aluminum Foil
White Copy Paper (Blank or With Copies of Haring Images)
Pens and Pencils
Tape
Tempera Paints and Paint Brushes
Permanent Black Magic Markers
Procedure
Step One:
Cut tag board/cardboard to desired size. Tear and place enough of the shiny side of the aluminum foil, so it fully covers one side of the tag board and folds over to the back. Keep the foil flat, unless you are looking for a textured painting surface. Place tape on the back to secure foil.
Step Two:
For young kids, I draw simple Keith Haring designs on copy paper, make copies, and then let the boys or girls choose the one they want to work on. I encourage older boys and girls to create individual Keith Haring designs on white copy paper using pens. Cut paper so a portion of it folds over the tag board.
Step Three:
Place copy or drawing on top of the foil that is attached to the tag board. Fold the paper over and place a bit of tape on the back to keep it from shifting, or carefully hold the paper in place.
Step Four:
Trace the drawing with a dull pencil pressing down hard enough to etch the drawing into the foil. Remind the boys and girls to not lift up the paper, as it is almost impossible to place it back exactly where it was originally. (We did come up with some interesting double traced designs, though.)
Step Five:
Remove the paper and using tempera and a brush, have kids paint drawings using bright colors. Apply a fairly heavy application and then add a second or third coat as the paint dries. Adding a bit of liquid soap, may also help the paint stick better.
Step Six:
Have students outline their pictures and add details with the permanent markers. Be careful not to rub paint off with markers. Mount on construction paper.
Images

Definitely using this for my summer program!
Love IT!
Viewing this lesson made me change my mind on having my class use paper to create a Keith Haring design. I really like the idea of aluminum foil! I think I will try this. Thanks.
using bright coloured markers is just as effective as paint (and not as messy!). for the younger students, templates of dancing figures would also help.
The whole process of making these wonderful works of art was very exciting and engaging. The only problem we experienced was when we let the paint dry; it crackled and separated from the foil in many places. When lifted up, some of the paint fell off altogether. Fortunately, we liked the look of the “unexpected effect” and just went with it. We did seal it with a spray-on matte acrylic sealer to keep any more pieces from falling off. Not sure how to correct it, should the artist not desire the crackled and 3-D effect. Any solutions or ideas would be very much appreciated, as I see this as an activity that we will come back to time and again. Thank you for posting such a fantastic art project!
We did try with the liquid soap, also, but still had the same effect. We will try again and see what works; we might not have applied a heavy enough first layer to begin with. Did you let the paint dry completely before adding additional coats?
Colored Sharpies or permanent markers to color the figures are a sure thing. No mess and no peeling paint. The colors are very vibrant too.
You might try adding canned milk to the tempera paint. I took a class years ago for a professional sign painter and that’s what he used when painting windows.
great lessson